Let’s get one thing straight: trader risk management is the foundation that will keep you in this game long enough to find success. It’s not about a secret indicator or a perfect entry; it’s the disciplined set of rules you live by to protect your capital from those devastating losses that can and will happen without a plan.
Why Risk Management Is Your Only Real Edge

Here’s a hard truth most trading gurus won’t tell you: trading is incredibly difficult. If you’ve ever felt the sting of a huge loss, the frustration of a winning trade turning sour, or the anxiety of watching your account shrink, you’re not alone. That experience is a shared, and often painful, part of the journey.
So many new traders think the secret is some magic indicator or a perfect entry signal. They burn through hours, days, and even years chasing a “holy grail” that promises easy profits. But it’s almost never a bad strategy that blows up an account. It’s a lack of disciplined risk management.
The Sobering Statistics of Trading
The numbers don’t lie. Data from regulators like the UK’s Financial Conduct Authority (FCA) consistently shows that around 80% of retail forex traders lose money. Some studies have suggested that an even more shocking 99% of traders can’t stay profitable for more than four quarters in a row.
These stats aren’t here to scare you off. They’re here to ground you in reality. The traders who make it aren’t the ones who never lose; they’re the ones who have mastered the art of controlling their losses. Their focus is on long-term survival, not short-term thrills.
“Your number one job as a trader is not to make money. It’s to protect what you have. If you can do that, the profits will eventually follow.”
This shift in mindset is everything. It turns risk management from a boring chore into your most powerful weapon. It’s your shield against the market’s chaos and your own worst impulses.
The Four Pillars of Trader Risk Management
A quick look at the core components of a solid risk management strategy and why each one is essential for protecting your trading capital.
| Pillar | What It Is | Why It’s Critical | Primary Benefit |
|---|---|---|---|
| Smart Position Sizing | Deciding how much to risk on a trade relative to your account size. | Prevents a single bad trade from wiping out your account. | Capital Preservation |
| Strategic Stop-Loss | Your pre-planned exit point if a trade goes against you. | Caps losses and removes emotion from the decision to exit. | Damage Control |
| Favorable Risk/Reward | Ensuring your potential wins are much larger than your potential losses. | Allows you to be profitable even with a lower win rate. | Long-Term Profitability |
| Disciplined Journaling | Meticulously tracking and reviewing every single trade you take. | Creates a feedback loop to identify and fix your mistakes. | Continuous Improvement |
These pillars don’t work in isolation; they form a complete defensive system. Without smart sizing, a stop-loss won’t save you. Without a good risk/reward ratio, a high win rate might still result in a net loss. And without a journal, you’re just flying blind, hoping for the best instead of making data-driven adjustments.
In the sections ahead, we’re going to break down each of these pillars with practical, actionable steps you can start using today.
How to Calculate Position Size and Control Exposure
This is where you stop guessing and start taking mathematical control of your trading. So many traders think a hot tip or a perfect chart pattern is their ticket to success, but they completely miss the single most powerful tool they have: position sizing.
Position sizing is the bedrock of real risk management. It defines exactly how much you stand to lose before you even think about entering a trade.
Without a strict sizing model, your emotions will call the shots. After a big win, you might feel invincible and place a massive bet — only to give back all your profits and then some. Or, after a few losses, you might fall into the “revenge trading” trap, doubling down recklessly to try and win it all back in one shot. We’ve all been there. It’s a human reaction.
A disciplined approach to position sizing is your best defense against these destructive habits. It makes sure no single trade can ever knock you out of the game, giving your strategy the room it needs to work over the long haul.
The 1% Rule and Calculating Your Maximum Risk
A foundational concept in trading is the 1% rule. The principle is simple: never risk more than 1% of your total account equity on a single trade. Some traders might stretch this to 2%, but the core idea is the same — keep your risk per trade consistently small.
Let’s see what this looks like in the real world with a practical example.
- $5,000 Crypto Account: If you’re trading with a $5,000 portfolio, your maximum risk per trade should be just $50 (1% of $5,000).
- $25,000 Stock Portfolio: With a larger account of $25,000, your maximum risk per trade would be $250 (1% of $25,000).
This number is non-negotiable. It doesn’t matter how confident you are in a setup; the maximum dollar amount you can lose is determined before you even think about hitting the ‘buy’ button. This discipline is what separates professionals from amateurs.
This maximum risk value is the starting point for every single trade calculation you make. It puts an objective ceiling on your potential loss, taking the emotional guesswork out of how much capital you should allocate.
The Position Sizing Formula
Once you know your maximum dollar risk, you need to translate that into a specific number of shares, contracts, or lots. This requires knowing your entry price and, crucially, where you’ll place your stop-loss. The distance between those two points is your per-share (or per-unit) risk.
The infographic below breaks down the simple, three-step process for calculating your ideal position size.
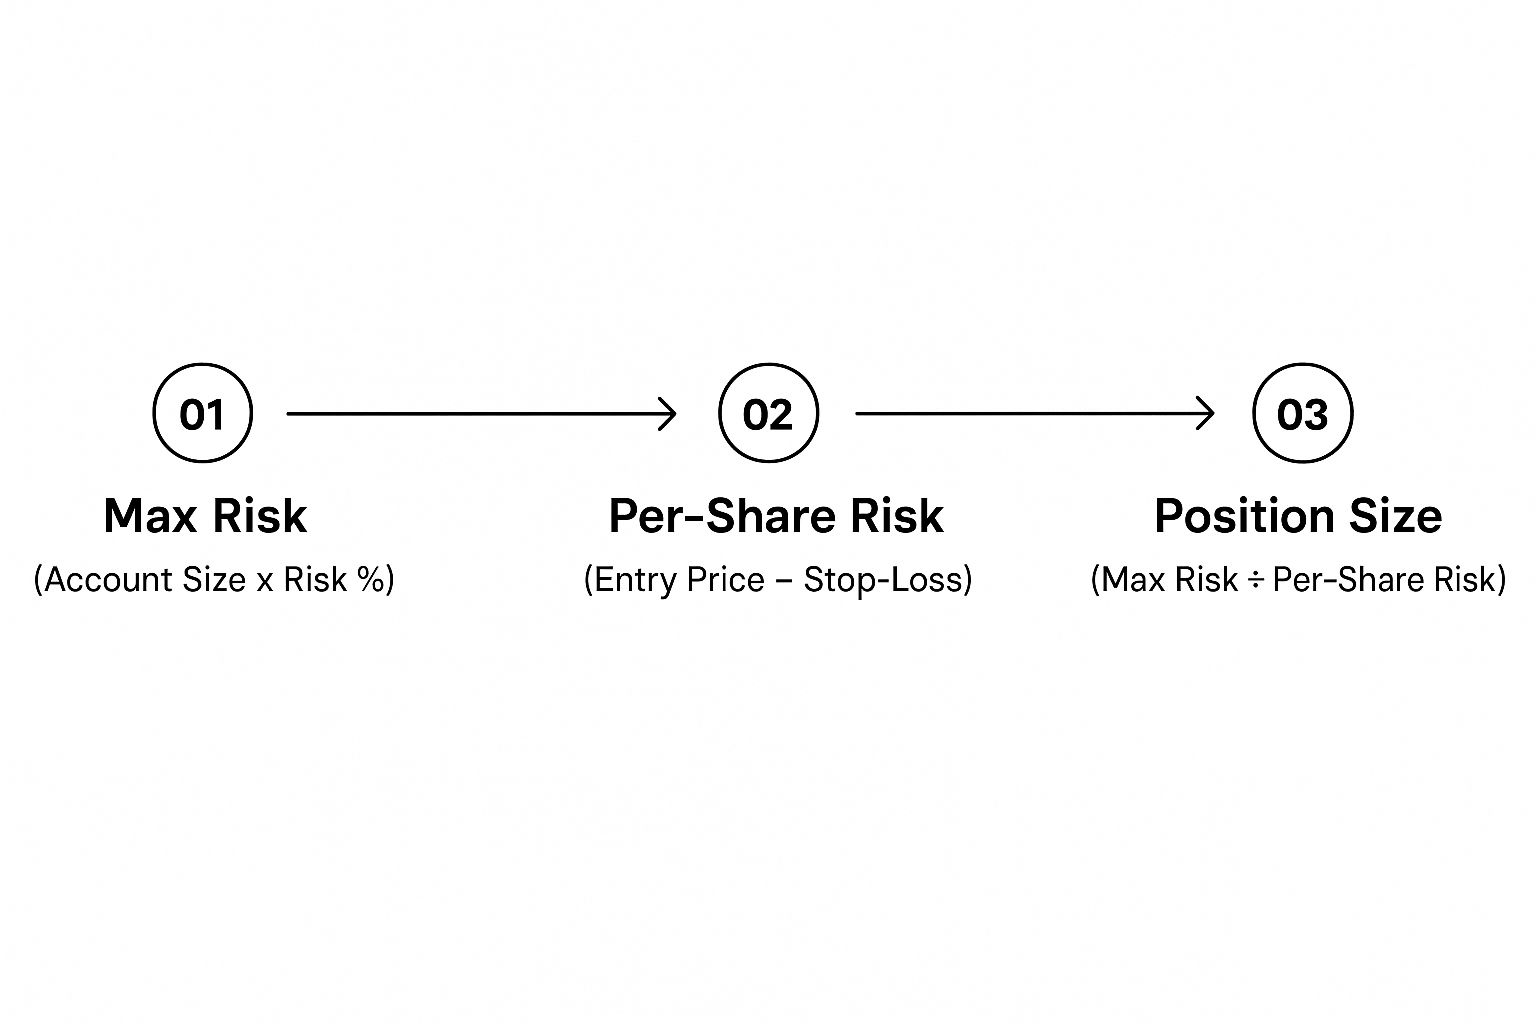
This process guarantees that your position size is always tailored to both your account size and the unique risk profile of each specific trade.
Let’s walk through a concrete example.
Scenario: A Stock Trader
- Account Size: $25,000
- Max Risk (1%): $250
- Trade Idea: Buy stock XYZ at $50.00
- Stop-Loss Placement: $48.00 (just below a key support level)
First, figure out your per-share risk. That’s just the difference between where you get in and where you get out if you’re wrong.
- Per-Share Risk: $50.00 (Entry) – $48.00 (Stop-Loss) = $2.00
Now, just divide your maximum dollar risk by your per-share risk to get the number of shares to buy.
- Position Size (Shares): $250 (Max Risk) ÷ $2.00 (Per-Share Risk) = 125 shares
So, in this scenario, you would buy 125 shares of XYZ. If the trade turns against you and hits your stop-loss at $48.00, your total loss will be exactly $250 (125 shares × $2.00 loss per share) — which is precisely 1% of your account. You’ve perfectly controlled your exposure.
Setting Smart Stop-Losses That Actually Work
We’ve all been there. You get stopped out of a trade, only to watch the market immediately reverse and take off toward your original price target. It’s one of the most maddening experiences in trading, and it usually happens for one reason: our stop-loss was placed based on a random rule, not market logic.
A stop-loss isn’t just an arbitrary price you pick out of thin air. It’s a strategic decision that should be dictated by what the chart is telling you. Moving beyond simplistic rules like “always set a 2% stop” is a massive step forward in your trader risk management.
Your stop-loss should be the exact price where your original reason for entering the trade is proven wrong. It’s not a failure — it’s just a non-negotiable cost of doing business, one that protects your capital when a trade idea doesn’t pan out.
Placing Stops Based on Market Structure
One of the most reliable ways to set a stop-loss is to use market structure — specifically, key support and resistance levels. These are the price zones where buying or selling pressure has historically been strong enough to stop or reverse a trend.
Placing your stop just beyond these levels gives your trade the room it needs to breathe and survive the normal ebb and flow of the market.
- Practical Example (Long Trade): You want to buy a stock that just bounced off a previous low of $45. Your entry is $46. Instead of a random stop, you place yours at $44.75, just below that critical $45 support level. If the price breaks below $45, your trade idea is likely invalid anyway.
- Practical Example (Short Trade): You’re shorting a currency pair that has failed to break above 1.2500 three times. Your entry is 1.2480. You place your stop at 1.2515, just above that strong resistance. If it breaks through, you want to be out.
With this approach, you’re forcing the market to prove your thesis wrong. If a key support level breaks, the bullish case is probably dead, and you want to be out of that trade anyway. For a deeper dive, check out our guide on how to set stop losses.
A stop-loss based on an arbitrary percentage is about what you are willing to lose. A stop-loss based on market structure is about where your trade idea is proven wrong. The second approach is always more powerful.
Using Volatility to Your Advantage with ATR
Every asset has its own personality. A high-flying tech stock moves completely differently than a slow-and-steady utility stock. Using the same fixed-percentage stop on both is a recipe for disaster. This is where the Average True Range (ATR) indicator becomes your best friend.
The ATR gives you an objective measure of an asset’s average price movement over a set period. It tells you its typical volatility. Instead of guessing how much wiggle room a trade needs, you can use the ATR to make a data-driven decision.
A Quick Example: Using ATR for a Stop-Loss
Let’s say you want to go long on a stock trading at $100. You pull up the 14-day ATR and see it’s $2.50, meaning the stock moves about $2.50 per day on average.
- Find your structural level: You spot a solid support level at $98.00.
- Add an ATR buffer: To avoid getting shaken out by noise, you decide to place your stop one full ATR value below that support.
- Calculate the stop price: $98.00 (Support) – $2.50 (1x ATR) = $95.50.
Your stop is now at $95.50. It honors both the key support level and the stock’s typical daily volatility, making it far less likely to get hit by random price swings. This dynamic approach is a game-changer, especially in choppy markets.
Applying Risk Reward Ratios for Long-Term Profitability
It’s a classic rookie mistake: getting obsessed with your win rate. So many traders think they need to be right most of the time to make money. It’s an easy mental trap to fall into, but it’s one of the most destructive habits you can develop.
Smart trader risk management isn’t about winning every trade. It’s about making sure your wins are big enough to wipe out your losses and then some. This is where the risk/reward ratio becomes your best friend — a simple but powerful metric that shifts your focus from being right to being profitable.
Calculating Your Risk to Reward
Before you even think about hitting the buy button, you need to know two things cold: your exit plan if the trade goes south (your stop-loss) and your goal if it goes right (your profit target).
The risk/reward ratio is just a way of comparing those two outcomes. It’s calculated by dividing your potential profit per share by your potential loss per share.
Let’s walk through a real-world example. Say you’re eyeing a stock trading at $100.
- Entry Price: $100
- Stop-Loss: You see a solid support level at $98 and decide to place your stop just below it at $97.50.
- Profit Target: You’ve identified a resistance area at $105, making it a logical place to take profits.
Your potential risk is the distance from your entry to your stop: $100 – $97.50 = $2.50 per share.
Your potential reward is the distance from your entry to your target: $105 – $100 = $5 per share.
To get the ratio, just divide the reward by the risk: $5 ÷ $2.50 = 2. This gives you a clean 1:2 risk/reward ratio. For every dollar you put on the line, you stand to make two. Now that’s a trade worth considering.
Why a 1:2 Ratio Is the Minimum Standard
Consistently finding and taking trades with a good risk/reward ratio is what gives you a real mathematical edge in the market. Most pros won’t even look at a setup unless it offers at least a 1:2 ratio — meaning the potential gain is at least double the potential loss.
Why is this rule so non-negotiable? Because it completely flips the math of profitability in your favor.
A trader with a high win rate but poor risk/reward can still bleed money. On the other hand, a trader with a mediocre win rate but excellent risk/reward can be wildly profitable. This is the secret to staying in the game long-term.
Let’s break it down with two traders. Both start with a $10,000 account and risk 1% ($100) per trade.
Trader A: The “Breakeven” Grinder
- Win Rate: 50%
- Risk/Reward Ratio: 1:1
- Over 10 trades, Trader A wins 5 for a total of +$500. They also lose 5 for a total of -$500.
- Result: After 10 trades, their net profit is $0. They’re spinning their wheels and going nowhere.
Trader B: The Profitable Professional
- Win Rate: 50%
- Risk/Reward Ratio: 1:2
- Over 10 trades, Trader B also wins 5. But since their reward is twice their risk, each win is $200. Their total winnings are +$1,000. They lose the other 5 for a total of -$500.
- Result: After 10 trades, their net profit is a solid $500.
They had the exact same win rate. The only difference was that one of them demanded better compensation for the risk they were taking. This discipline takes a huge psychological weight off your shoulders. You no longer feel the need to be perfect. You can absorb a string of small, controlled losses, knowing that just one or two well-planned winners can erase them and put you in the green.
Using a Trading Journal to Refine Your Strategy

If position sizing is your shield and stop-losses are your armor, then a trading journal is the feedback loop that turns raw experience into hard-earned expertise. It’s easily the most effective tool for sharpening your approach to trader risk management, yet it’s the one most traders push aside.
Lots of traders think of journaling as a chore — just a simple diary of wins and losses. But when you use it right, it becomes an analytical powerhouse. It pulls your trading out of the realm of random events and transforms it into a personal performance database you can actually study, learn from, and act on.
Moving Beyond a Simple Diary
A modern trading journal, like the one we built at TradeReview, is so much more than a spreadsheet for jotting down entries and exits. It’s a system for tagging and analyzing every single aspect of your trading decisions, giving you a crystal-clear picture of what’s working and what’s costing you money.
This process forces you to be brutally honest with yourself. Did you actually follow your rules? Did you stick to your planned risk? Documenting everything cuts through the emotional fog and puts the hard data right in front of you. This is where you uncover the hidden habits that are probably holding you back.
For example, you can start tracking key performance indicators that really matter:
- Performance by Setup: Tag every trade with the specific strategy you used — like “breakout” or “mean reversion.” Over time, you’ll see which setups are actually making you money.
- Planned vs. Actual Risk: You planned to risk 1% but ended up losing 3% because you nudged your stop-loss, right? A journal puts those moments of indiscipline on full display.
- Time of Day Analysis: Are you consistently bleeding money in the first hour of the market open? The data will show you patterns your emotions are trying to hide.
Uncovering Hidden Patterns in Your Data
The real magic happens when you start reviewing your analytics dashboard. This is where all that raw data turns into actionable insight, helping you make objective, intelligent tweaks to your risk rules.
From here, you can start asking the kind of critical questions that lead to real improvement.
- “Is my average winner only slightly bigger than my average loser?” If so, you’re probably cutting your winners short out of fear, which completely torpedoes your risk/reward ratio.
- “I have a high win rate on a specific setup, but one huge loss just wiped out a month of gains.” This is a massive red flag. It could point to a major issue with where you’re placing your stops for that particular strategy.
- “Am I consistently taking unplanned, impulsive trades right after a loss?” By tagging trades as “emotional” or “unplanned,” you can put an exact dollar amount on the cost of your revenge trading.
Journaling isn’t about judging your past performance; it’s about gathering the evidence you need to build a more disciplined and profitable future. It’s the ultimate tool for accountability.
This data-driven approach is what builds the discipline you need for long-term success. If you’re new to all this, our guide on why every trader needs a trading journal is the perfect place to start. It’ll help you shift from hopeful guessing to making decisions backed by your own performance data — the final pillar of a truly solid risk management framework.
Common Questions About Trader Risk Management
Even with a solid plan, the questions always find a way to creep in. It’s one thing to understand risk management in theory, but it’s a whole different ballgame when you have to apply it under pressure with real money on the line. This is where discipline is really tested.
I’ve pulled together some of the most common questions I hear from traders. Getting these cleared up can help you push past those sticking points and build the confidence you need to stick to your plan, even when the market gets chaotic.
How Much Should I Risk Per Trade?
This is the big one, the absolute foundation of it all. And the answer is surprisingly simple: most pros risk between 1% and 2% of their account capital on any single trade. It might not sound like much, but that small number is what keeps you in the game long-term.
Let’s put that into perspective. If you have a $10,000 account, your maximum loss on one trade should be capped at $100 to $200. The amount should feel almost boring. If the thought of hitting your stop-loss makes your heart pound, you’re risking too much. A single loss should never be an emotional event or make you feel like you have to “win it back” on the next trade.
Should I Adjust My Stop-Loss Once a Trade Is Open?
There’s a hard-and-fast rule here, with just one exception. You should never, ever move your stop-loss further away from your entry. Widening your stop to give a losing trade more “room to breathe” is a classic rookie mistake. It’s an emotional decision that turns a small, acceptable loss into a massive, account-denting one.
The only time you should touch your stop is to move it in the direction of your winning trade. This is what’s known as a trailing stop, and its sole purpose is to protect your profits. Once a trade moves firmly in your favor, you can slide that stop up to your entry price (break-even). Now, the worst that can happen is you walk away with nothing lost.
Is a High Win Rate Necessary to Be Profitable?
Nope. Not even close. This is probably one of the biggest myths in trading. Your profitability isn’t just about your win rate; it’s a combination of your win rate and your average risk/reward ratio.
A trader with a totally mediocre 40% win rate can be wildly profitable if their average winner is three times bigger than their average loser (a 1:3 risk/reward). On the flip side, someone bragging about a 70% win rate can easily be bleeding money if their tiny wins are constantly getting wiped out by a few huge, uncontrolled losses.
Professional trader risk management is about math, not magic. Focus on making sure your winners are meaningful, and you won’t need to be right all the time.
What Is the Biggest Risk Management Mistake New Traders Make?
Hands down, the most common and damaging mistake is focusing 100% on finding the perfect entry signal while completely ignoring risk management. It’s like building a race car with a massive engine but no brakes.
New traders often make emotionally driven decisions. They use inconsistent position sizes, betting the farm when they feel confident and barely risking anything when they’re scared. They ditch stop-losses because they hate the idea of “taking a loss,” or worse, they let losers run and run, just hoping they’ll turn around. We’ve all been tempted to do this.
A brilliant strategy is totally worthless without a solid foundation of risk management to protect it. Your rules for position sizing, stop-losses, and risk/reward are what allow your trading edge to actually work over the long haul. Without them, you’re not trading — you’re just gambling.
Ready to stop guessing and start making decisions backed by your own data? A trading journal is the ultimate tool for accountability and for dialing in your risk strategy. TradeReview gives you a powerful, free platform to log every trade, see your performance with detailed analytics, and finally uncover the patterns that are holding you back.
